We are going to learn how to model a standard glass in blender. You could think why we are modeling glass. Because doing this we will learn many things.
What we will learn by modeling glass in blender
We will learn to add primitive object cylinder, modify properties of primitive, modifying object in edit mode selection methods, inset face, extrude and may things. So be ready to learn. Go slow, do everything step by step. Lets start now :Steps of Modeling Glass in Blender
Now follow the steps given bellow carefully. If you have any confusion let me know in the comments :Step 1
First of all we should do our unit setup for the file. Set it to 'Metric'. If you don't know how to setup the unit in blender, please go to the one of my post here.
Step 2
Select the default cube by right clicking on it and press x or delete button and then press enter to conform the delete.
Note 1
Now we will add a cylinder to make a glass. Why we are choosing a cylinder? why not cube or anything else?? Because the glass we are going to make will be matching the cylindrical shape. We should choose that primitive mesh which matches our object best. But its not always necessary though it makes process easy and fast a little bit.
Step 3
So first we need to make the 2D cursor at the center of view port, cause the new objects is always added at the position of 2D cursor. And you may have accidentally placed the 2D cursor to somewhere else. Press Sift + S and then choose 'Cursor to center'. To Know more about 2D cursor go to my another post here.
Step 4
To add cylinder press Shift + A and then go to Mesh and then click on cylinder. To know another methods of adding objects in blender go to my another post here.
Step 5
Now before clicking anywhere else you should tweak some options like cylinder size, radius, vertices ( number of side edges for Max or Maya Users) and cap fill type.
By default the vertices in the cylinder is 32 but we will use 12 for our glass and will use a modifier to smooth it. Now enter the following data in there field respectively:
- Radius - 1.5"
- Depth - 5"
- Cap Fill Type - Triangle Fan
Step 6
Now cylinder may look like very small depending on your zoom level. Press full stop symbol on num pad to bring the selected cylinder in focus and framed to viewport (work like F key in Maya).
Step 7
Before going further we should rename the cylinder to glass. Go to Object tab in property window and change the name to glass and press enter.
Step 8
Now press Tab to go into the edit mode.
Step 9
Now press Ctrl + tab and select vertex.
Step 10
Right click on upper middle vertex to select it.
Step 11
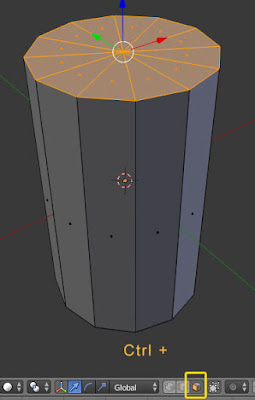
Now hold Ctrl button and click on face select button to select connected faces to that vertex.
Step 12
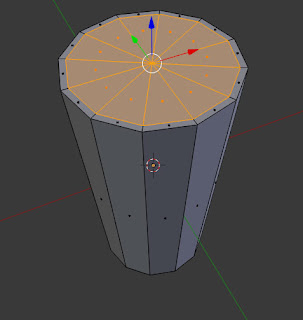
Keep your mouse in the viewport but a little far from the selection then press I button on the keyboard to inset the selection and move your mouse towards the center of selection to scale it down a little or move far from the selection center to scale it up. scale it a little inside from outer edge and then press left click to conform it.
Step 13
Now rotate view to go to the lower side of the cylinder and then go to vertex selection mode and select the center vertex.Now hold Ctrl and click face select to select connected face and then press S button on the keyboard to scale it down a little bit then left click to conform it.
Step 14
Now Rotate the view to look at upper part. Choose vertex selection mode and select center vertex of the upper part then hold Ctrl and click face select to select the connected faces.
Step 15
Now go to the Orthographic side view by first pressing 5 number key on num pad and the pressing 1 number key. and then press Z button on the keyboard to go into the wireframe mode.
Step 16
Now keep your mouse in the view port and and press E button on the keyboard to extrude the selected faces, now drag your mouse down till the selected faces is a little bit above the base. now left click to conform the extrude.
Step 17
Now press S to scale the selection inside the glass like the image given bellow.
Step 18
Now press 5 number button of the numpad to return to the perspective view and then press Z button of the keyboard to return to the solid shading mode.
Step 19
Now we need to give the glass supporting edges so when we apply Subdivision Surface modifier to smooth it, the shape of glass should hold the volume. To do this rotate the view so that the side of glass is visible. Now hover your mouse at the center of the glass and press Ctrl + R ( this is similar to edge loop tool of the Maya ). After pressing Ctrl + R a pink edge will appear at the middle of the glass.
Step 20
Now press left click once and drag the edge towards upper edge and when you are just a little bit far from the upper edge press right click to place the edge there.
Step 21
Do the same thing for lower edge, and for inner wall's upper and lower edges too.
Step 22
Now select the lower faces and inset them.
Step 23
Now place your mouse inside the indicated pink area in the bellow image and insert a edge loop and now drag outward to the outer edge and then place the edge.
Step 24
Do the same thing for inner base.
Step 25
Now place an edge at the thickness of glass.
Step 26
Now go to the side and place the mouse at the middle of the glass and press Ctrl + R. Now rotate the mouse wheel to increase the number of edges.
Step 27
Increase it to 8 and the left click and then right click to place the edges.
Step 28
Do the same for inner wall.
Step 29
Now press Tab to go to object mode. While the glass is selected click on smooth shading button.
Step 30
While the glass is selected go to modifier tab of property window and then click on 'Add Modifier' and then choose 'Subdivision Surface'.
Step 31
Now increase the view subdivision to 2.
See, by following these steps your glass is ready. Now for the presentation shake we should take render of our glass.
Rendering Our Glass
To render your glass first select the Lamp ( Light ) in the view port then go to lamp data in the property window, and then switch the lamp to Hemi type.Now select your glass from outliner and place your mouse in the viewport and press the dot button of the num pad to zoom in the glass.
Now zoom out a little bit like the bellow image.
Now hold Ctrl and press 0 on num pad. It will set the camera to the view.
Now press F12 to take render.
WOW ! Your glass is ready. Show it to your friends. If you have any confusion or difficulty to understand anything, let me know in the comments. Have Fun and Happy Blending


No comments:
Post a Comment